EMAIL SUPPORT
dclessons@dclessons.comLOCATION
USSNMP Configuration in ACI
Although Cisco ACI exposes all the information through API, a traditional SNMP monitoring can still be performed. You can check the system’s CPU and memory usage using SNMP to find out if the CPU is spiking.
SNMP read queries and SNMP traps are supported by both leaf and spine switches and by Cisco APIC.
All current versions of SNMP (v1, v2c, and v3) are supported. SNMPv3 is more secure, since it supports authentication and encryption. Each SNMPv3 device can be selectively enabled or disabled for SNMP service. In addition, each device can be configured with a method of handling SNMPv1 and SNMPv2c requests. You cannot use SNMP set commands.
Configuring SNMP Policy
To configure the SNMP policy using the Cisco APIC GUI, follow these steps:
-
In the menu bar, click Fabric.
-
In the submenu bar, click Fabric Policies.
-
In the Navigation pane, first expand Policies.
-
Under Policies, expand Pod.
-
Right-click SNMP and choose Create SNMP Policy (or edit the default policy fields).
-
In the SNMP policy dialog box, perform these actions:
-
In the Name field, enter an SNMP policy name.
-
In the Admin State field, select Enabled.
-
(Optional) In the SNMPv3 Users table, click the plus sign (+), enter a Name, enter the user's authentication data, and click Update. This step is needed only if SNMPv3 access is required.
-
In the Community Policies table, click the plus sign (+), enter a Name (include only alphanumeric characters and do not include the @ symbol) and click Update.
-
In the Trap Forward Servers table, click the plus sign (+), enter the IP Address of the external server and click Update.
-
-
To configure allowed SNMP management stations, perform the following actions in the SNMP policy dialog box:
-
In the Client Group Policies table, click the plus sign (+) to open the Create SNMP Client Group Profile dialog box.
-
In the Name field, enter an SNMP client group profile name.
-
From the Associated Management EPG drop-down list, choose the management EPG.
-
In the Client Entries table, click the plus sign (+).
-
Enter a client's name in the Name field, enter the client's IP address in the Address field, and click Update.
-
-
Click OK.
-
Click Submit.
-
Under Fabric > Fabric Policies > Pods, expand Policy Groups and choose a policy group or right-click Policy Groups and choose Create POD Policy Group. You can create a new pod policy group or you can use an existing group. The pod policy group can contain other pod policies in addition to the SNMP policy.
-
In the pod policy group dialog box, perform the following actions:
-
In the Name field, enter a pod policy group name.
-
From the SNMP Policy drop-down list, choose the SNMP policy that you configured and click Submit.
-
-
Under Fabric > Fabric Policies > Pods, expand Profiles and click default.
-
In the Work pane, from the Fabric Policy Group drop-down list, choose the pod policy group that you created.
-
Click Submit.
-
Click OK.
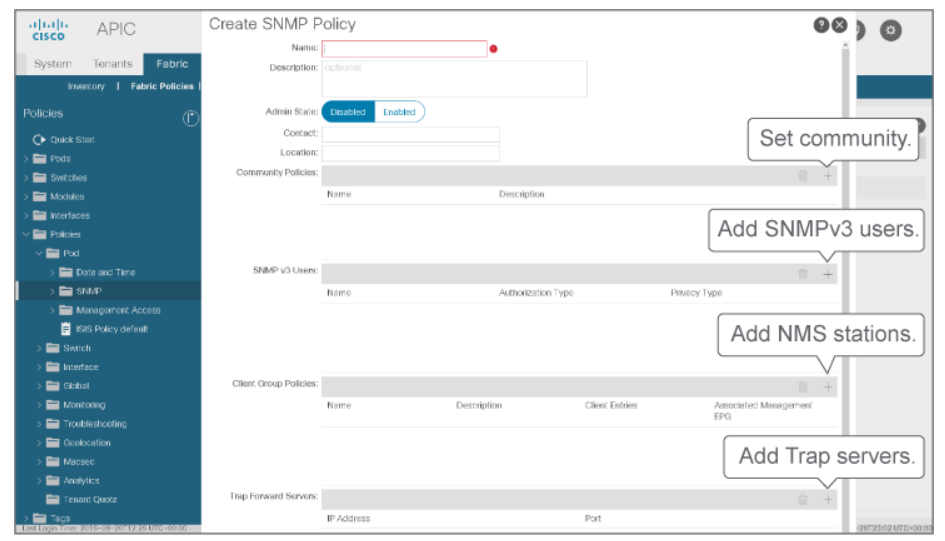
The following figure shows the dialog box for creation of SNMP policy using the Cisco APIC GUI:
 Configuring SNMP Traps
To configure SNMP traps, you must separately configure the host information for an SNMP manager (destination) that will receive the SNMP trap notifications, and select and enable a source object within the fabric to generate SNMP trap notifications.


LEAVE A COMMENT
Please login here to comment.